Weaving a tartan tea towel (sort of)

I have been interested in learning to weave tartan in a sporadic sort of way for a while now. I have friends with Scottish ancestry who I would like to make tartan for and the whole history of how tartan came to be is just really interesting. Tartans did not come from Scotland alone, they were a part of a lot of European cultures and came about as a way of using varied dye lots in a more or less deliberate looking pattern. That sort of reasoning is really what attracts me to tartans; a lot of my crafting is of the I-meant-to-do-that mistake variety and I love finding historical kindred spirits.

Natural dyes being what they are, even if you gather the dye material from the same place at the same time of year and use it in the exact same way on the exact same materials, you will probably end up with a different shade (if not colour) than you got last time. I can see why a weaving pattern that incorporates many different shades and colours in a harmonious way would be an asset to any weaver, and so the tartan was born. Then, in more modern times, we began to register and record our tartans and they became like identifying plumage to a bird. After they began to be associated with clans, they had to be made with a certain set of colours and in a specific pattern.

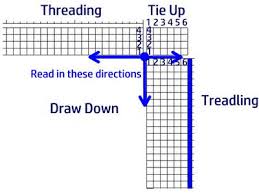
I found the Scottish Register of Tartans which I promptly joined, as I discovered that they will email you the weaving pattern for any tartan registered with them. The patterns are a bit hard to understand, but I got there in the end. They include the colours and shades, right down to approved dye lots for each tartan (it took ages to figure that bit out)

This is what they sent me whe I asked for the Munro tartan;

Threadcount:
G8AS8G8R64B4Y4R12B24R12Y4B4R12G64R12B4Y4R96

Pallet:
AS=CC4438ANC SCARLET;R=C80000RED;G=006818GREEN;Y=E8C000YELLOW;B=2C2C80BLUE;

Threadcount given over a half sett with full count at the pivots.

Suffice it to say that I read a lot about tartan weaving to be able to decipher that lot. The reference to ‘pivots’ gave me the most trouble. Eventually I found a reference to the fact that the ‘pivot’ is the point where the pattern starts to repeat itself in mirror image. If you don’t understand that, you are not alone, it took me ages, and I’m not sure I’ve got it right yet.

This was the warp I came up with. It turned out rather jewel like I think.

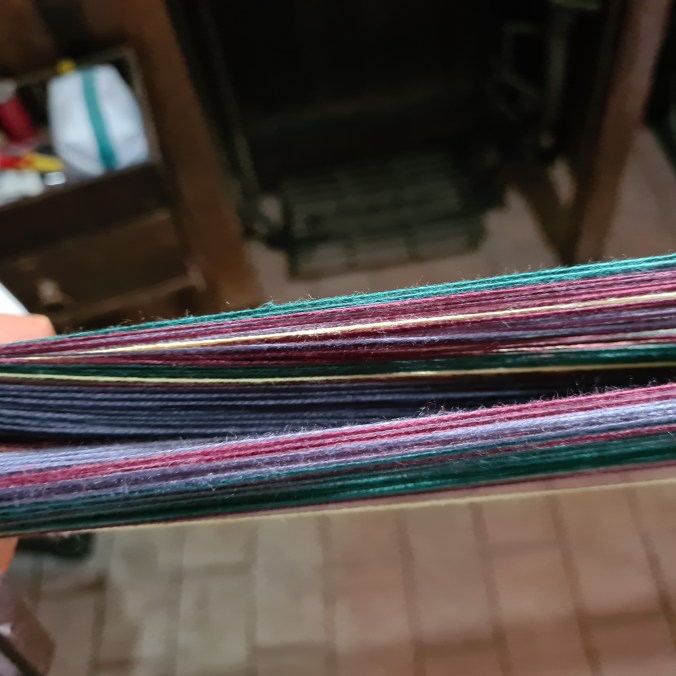
I decided to make some tea towels to give the pattern a go. Of course I didn’t have the right colours, but I wanted to make my mum some tea towels anyway, so I warped up the closest colours I had.

Warped up and ready to weave
And goes on and on and on

Until one day the end was reached

This is the Munro tartan from the Registry. I can see the pattern in the tea towels, The colours are wrong, but the thread count matches.
Then the fabric was overlocked
And washed

Hemming has always been a problem for me. I’m just a really messy hemmer. These hems are not too bad though.

It’s not a proper tartan of course; the weave is not twill (just plain weave) and the balance isn’t perfect (my squares are rectangles not … squares), but as a first try, I’m ridiculously proud of my tea towels and I think my mum will like them.

Weaving rag rug bath mats

I don’t buy clothes often, I don’t even have clothes given to me often, so where do the overflowing cupboards and draws come from? Do my clothes meet mates and start a family? Producing new, aged looking tshirts and jeans. Do the Fair Folk steal clothes from other people’s lines and use my cupboard as an off site storage for their stolen goods? Or does my daughter secretly buy clothes and sneak them into my cupboard? Who knows?

Every six months or so, I go through my clothes and give away a box or bag of things I don’t wear, but there are always clothes that are too far gone to be passed on. These stained, torn and stretched items of apparel go to a variety of places; they become cleaning rags, animal bedding or rag rugs. Every now and then I take a load of frayed and stained cleaning rags, worn too thin from multiple washes and soaks, to the massive hole where we throw our paper, old furnitire and other biodegradable items. There the cloth joins the rest of the compost in waiting, slowly turning back into valuable top soil.

Making rag rugs uses up a lot of the extra fabric in our house. I cut the cloth into strips and wind the strips into balls to be woven at a later date (when the draw I store them in begins to overflow). Now that we have an indoor bathroom, I can make a few new mats to use as bathmats, whereas previously they would be used as animal beds and floor rugs beside the bed (my vain attempt to keep our sheets clean).

The process of making some rag rugs is simple;

Cut your old clothes and cloth into strips;

Tshirts- I use this method to get the most from my tshirts. I’m not usually so careful about cutting the seams off though.

jeans/pants- I use this method to turn pants into strips.

leggings or tights- I use this method to cut up leggings. This is roughly the same as for pants, but it is important to keep stretch fabric seperate from woven fabric. Stretch fabric will pull the warp in and make a smaller mat than woven fabric (see the photo of all three mats at the end of this post; the smaller mat is made from stretch fabric)

Warp your loom;

I use a cotton warp thread and double the warp in any size heddle I use (this one is 12.5 dpi). The size of the heddle (the thing with slots and eyes that warp is threaded through) doesn’t really matter with rag rugs, but I do find that the more warp threads I use, the stronger the rug is when it is finished.

Weave the rugs;

I weave an inch or so with an acrylic yarn before I start the rag section. This gives the mats a firm start and finish and also gives me a nice, neat indicater of when one rug finishes and another starts.

The bottom section of the weave in this photo is done with acrylic yarn, the top is rags.

Take them off the loom and finish the ends;

I just cut them off the loom and overlocked the ends. This makes for a neat edge and it seems to stay strong for a long time.

Use the new rugs;

These rugs are nice and big, they are very absorbant and they use up cloth that would otherwise go to landfill. Each mat will last for years. I have five year old rugs that are only just beginning to show wear. The warp threads seem to go first and the rag pieces pull out. I will try to save the rags from these older rugs to be re-woven into new mats in the future, and then I will feel like a super recycler!

Weaving is such an enjoyable hobby. I am thankful that I don’t have to weave cloth for the whole family, I would never get off the loom and the spinning wheel, but I do love that a lot of our cloth items are now handmade. I try to add a new item every year. By the time I am 90, we should be using only handmade cloth.

Making work horse tea towels

My new work horse tea towels
These are two of the last lot of tea towels I made. They have worn fairly well in the past year of constant use.

We need some new tea towels; the old ones are getting a bit ratty looking. I have been only using my hand made tea towels for a year or two now, and they have worn really well, but they have reached their limit. I decided to make up some plain and simple, but long lasting, smallish tea towels.

I pulled out the rigid heddle loom and some dark green, 8/2 cotton. I warped 120 ends with one strand per end and about three metres in length. Then I went looking for a waft yarn; I found a big roll of hemp yarn and another one of cotton 8/2 thread. I decided to use one of each strand as a double weft, and off I went to weave.

The weaving part went fairly quickly as I had some ghost stories on my computer as audio files that just played away while I wove sitting on my bed. After a week of weaving an hour or so most days, I had a big roll of cloth.

This weave looks sort of like a brick wall to me; what do you see?
Melvin helped me out at times
The roll is getting bigger and bigger.

I took the roll off the loom and overlocked the ends to secure the weft, then I washed the whole roll. This helps to make sure the cloth is not going to shrink any more once it is hemmed up and it also helps to stabilise the weave somewhat before it is cut into tea towel size pieces.

I used paper clips to mark the measurements for the tea towels. You can also see the loose lengths of weft where I started a new shuttle of hemp and cotton.
Overlocking the ends.

Each tea towel is going to be 25 cm wide and 40 cm long. I measured each length, cut and overlocked each end. I decided to leave the ends overlocked but not hemmed. I think this will wear well, but if it doesn’t I can always hem them later. I trimmed up the loose threads and folded my new tea towels.

I do love being able to make my own cloth items; it makes me feel so self sufficient! My next project is some rag rugs to use as bath mats in front of our new shower. They will use up some of our old,ripped and worn out clothes (which are made from old sheets and quilt covers in their turn).

I have been unwell lately; dizzy and weak with not much inspiration to do anything, I am hoping that this project means I am on the mend now. Weaving a project takes a fair amount of sustained concentration and energy, so the fact that this project only took a week of spurts of work means that I have more energy than I have had for quite a while. I have also ordered some more cotton for a more complicated project I will be making as a house warming gift for a friend.

A gratuitous photo of Melvin and his sister Penny. Penny is staying with us for a few days while her human mother is having a new baby (a human one). Penny is totally different to Melvin; so small and fine built, but they love to see each other and she keeps Melvin in line better than anyone else.

Sewing myself a new file bag for work

Now that I have the fabric and the card woven strap made for my file bag, I can start the sewing-it-together step. I decided to keep the pattern I had rather than making another strap (laziness).

I found a really good tutorial for making a messenger bag on YouTube which I am going to (loosely) follow.

First I cut out a single piece for the two sides of my bag and a piece for the flap. I also cut corresponding pieces of lining material and some cotton batting I was lucky enough to find. I sewed the batting to the lining pieces to make them easier to handle.

Then I sewed the side seams of the bag up and made those cute little corners (like I did for the tote bag). I did the same for the lining pieces. I also sewed the flap pieces together, right sides facing but leaving the top edge open so I could turn it inside out and top stitch.

Then I fiddled around with the best way to put all the pieces together so I could sew up the around-the-mouth seam of the bag. That one seam attached the handle, the flap and the inner and outer pieces together, but only if they were in the correct order.

Eventually I figured out the sequence (and then didn’t photograph it, but it’s the same sequence as in the tutorial video) and sewed the whole thing together. I turned it all right side out through a small hole I had left in the seam for the purpose.

After the small hole was sewn shut, I had my bag.

I have really enjoyed this little project and it has come together much faster than I would expect. No, it’s not perfect; the seams are wonky and some of the weaving is a bit dodgy, but I made it, I had fun doing it and I have something useful at the end of it. What more can I ask from life?

Card weaving straps for a new file bag

The waffle weave fabric is finished, I’m pleased with the result. It is a really spongy feeling fabric with a lot of character (rather like myself). Now to make some straps for the bag…

The finished waffle weave fabric

I decided to card weave some straps for handles because I haven’t used my inkle loom for a while and I’m on an if-you-don’t-use-it-throw-it-out kick (yes…I know that’s not the way to use the strategy, but it made sense to me). First I went looking for cotton yarn to match my fabric…

Then I played around with a pattern…

Card weaving patterns are easy to read; the numbers represent cards and the letters represent holes in the cards. In theory, if you thread your cards right you will get the pattern on the grid. Well… there is one thing I forgot to do; the empty squares under the numbers are to indicate whether the cards are threaded from back to front or front to back. It has been a while since I used this method, so I forgot that bit and it does make a difference.

You can see the letters on the cards in this photo
All threaded ready to go
That is not the pattern I threaded

The direction the cards are threaded makes a big difference to the outcome. Apparently it twists the yarn in the opposite direction making the pattern look completely different. I should have threaded card 1 from the back, card 2 from the front, card 3 from the back…and so on. I will finish this band and see how I feel about the new pattern. Maybe I will make another one, but the new pattern may grow on me (or I may be too lazy to do another one).

Next post will be about me sewing the bag together.

Making waffle weave cloth for a file bag

I need a new bag for dragging my paperwork, iPad and sometimes computer to work and back (sometimes the work stays in the bag for the night, meaning I took it all for a nice drive). I decided to make the project another of those long term, slow projects by making it from scratch. My first step is to plan the project (which usually tells me what I won’t be doing).

I want a bag big enough to carry a fair number of paper folders and that will hold it’s shape. I have a bag that I use at the moment; it is the right size but a little on the ordinary side when it comes to colour. This bag will be my sizing guide.

This is the current bag.

I am thinking I will make my new bag a similar size but will add a flap at the top in a messenger bag style. Maybe a pocket at the front (under the flap) will give the iPad a place to call home, if I can manage to figure out how to make it.

The bag is 40 cm wide…
and about 30 cm high.

The fabric will be hand woven from yarn I have in my stash. I have been wanting to try the waffle weave pattern on my rigid heddle loom…I guess now is the time.

First the weaving pattern;

I found a simple to follow pattern at Kelly Casanova’s weaving school.

It is a free course and so easy to follow. After a quick whizz through the course, I went looking in my stash for some yarn for the job.

I found some balls of red 8 ply acrylic and a ball or two of grey 8 ply acrylic. These yarns are really just hanging around waiting for an experiment to come along.

I warped the rigid heddle loom at a width of 50 cm to allow for shrinkage and pull in of the weaving and 1.3 metres long to allow enough fabric to make two sides, a front flap, two end pieces, a base and maybe a front pocket.

The slow warping process…best completed by the fire.
This is the waffle weave pattern. It took a while to get the lifting order in my mind.
At this angle you can sort of see the indents in the fabric that make it waffle weave. Apparently the waffles become more noticeable after it is off the loom.

After I have enough fabric for the project I will move on to card weaving some straps and find some scrap fabric for lining and making binding for the edges. What fun this is.

Weaving hemp and cotton tea towels

I admit it; I’m addicted to weaving tea towels. I also want to weave some wool fabric for making a coat, some silk scarves for gifts and some scrap yarn fabric for making bags, but when I find the time to warp something up, immediately my mind reaches for a tea towel draft and some absorbent yarn.

I did get a scarf or two of scrap yarn woven between tea towel weaves.

This project is a special one; it’s my first try at weaving with hemp (as the yarn…for those who were wondering). I bought a one kilo roll of fine (8/2 weight) hemp yarn, I just can’t seem to resist a good deal on yarns, and decided that it would be perfect for tea towels. Hemp is a bast fibre (meaning it comes from the stalks of a plant and is cellulose based) and is known to be very strong, resilient and absorbent when used in weaving. The yarn itself is very rough and stiff, it feels kind of like string to me, but my reading (and YouTubing) tells me it will become soft over time and use. Flax is very similar to this and linen, the finest, most hard wearing cloth is made from flax.

I decided to try out the Viking weave pattern again, because I really do love it. So first I wound a warp; this is a long, fairly tedious activity that involves winding yarn around a series of pegs to make lengths long enough to weave the items you had in mind. I am not good at maths, but I followed the instructions on the weaving draft to wind the warp 5.2 metres long (which should get me eight tea towels). Once I had the length decided, I wound the first length around the pegs until I had a 5.2m length, then I repeated that 408 times to get the width of cloth I needed (each length is called an end).

Just to make things interesting, I also had to count each end and divide them into bundles that fit into inch increments on the loom; using a length of yarn that crosses over every 24 ends (the pattern says there are 24 ends per inch), that way when it is time to wind the warp onto the loom the bundles could be distributed evenly along the back beam (using a raddle).

Each little red loop has 24 strands in it. That means that when I get to putting it on the loom I can divide each bundle into an inch slot.

When the warp was all wound and tied securely in a lot of places, I spread it out using my home made raddle. A raddle is basically a tool for holding yarn temporarily in the right place while it is put on the loom, I built mine from a photo on a weaving site (it is a very simple tool).

The raddle is the row of silver hooks on the bit of 2X1 pine. Each gap between the hooks on the raddle is an inch long.
The warp spread out on the raddle.
A nice neat warp so far.

Next I need to thread the warp. This involves threading each end through it’s assigned heddle (the wire bits hanging on the frames in the photo below) each heddle has a hole in the middle to allow the thread to pass through. The weaving draft tells me which frame each thread needs to be attached to.

Finished threading through the heddles, now for the reed.
All threaded through the reed and tied onto the apron bar. I used cardboard strips to spread the warp evenly then wove an inch or so with a pale yarn as a border.
I discovered a few loose threads that needed to be weighed down with hooks and sinkers at the back of the loom. These threads hang down in the shed and make mistakes in the weaving.
Then it is time to weave. I love watching the pattern emerge.
The first tea towel almost done.

My plan is to use the same pattern for each tea towel but to use different colours for the weft; all in 8/2 cotton of course.

I know this is a fairly complicated post, full of the jargon of weaving, but it is my attempt to document the process of making things I use in my everyday life, and I love the language associated with weaving, it is so ancient and full of seemingly nonsensical terms. It is really a very simple process that comes naturally to the hands but it is hard to explain in words.

Make a tote bag from hand woven fabric

I am busily using up scrap yarn from my overflowing stash. As part of that I wove a piece of fabric that is frankly…um…mixed up; I used all sorts of fancy yarns in the weft, eyelash yarn, boucle yarn and a little bit of ladder yarn. All that in no particular order, colour or pattern, just throwing in a little bit here and there.

What to do with this fabric? I decided to make a tote bag.

First I cut it off the loom and overlocked the edges.

I gave it a wash too, to test for shrinkage.

Next I cut a lining the same size and some handle material.

Then it was time to sew up both the bag and the lining into basic bag shapes. Leaving a small hole in the bottom of the lining to turn the whole thing inside out.

Sewing across the bottom corners gives the bag a nice square bottom. I didn’t forget to measure the same distance down the corner seam on each piece. I sewed the lining corners the same way.

The corners were folded so that the bottom seam and the side seam lay on top of each other; the seam you can see in the photo below is the side seam, it is laying on top of the bottom seam. This makes a sort of cross seam at the base of the bag.

Finally I sewed the top of the outer bag to the inner lining. The handles can be pinned between these layers. I went over the handle joins more than once when sewing this part; handle joins are subject to a lot of strain. The handles need to be looped downwards with the ends facing up towards the top of the bag, when sewing the top seam (I learned that the hard way).

Yes…the handle is the wrong way around. I had to unpick and re-sew the whole thing with the handles the right way around.

I turned it all inside out (or right side out) then sewed up the hole.

There’s the bag done. Not too bad for a scrap yarn project.

Now on to spinning more yarn to make more fabric to sew more things.

Making a Viking scarf for a friend

I have been learning how to get along with my four shaft counterbalance loom (who I call Wanda), she is an old lady who likes her own way. Recently I decided to make a scarf for a friend, my planning for the project went like this; I wanted to use Wanda to make a project, so I needed a four shaft, counterbalance friendly pattern (one that lifts two frames at a time, because counterbalance looms don’t open a big shed when only lifting one frame at a time). My friend reminds me of a Viking Shield Maiden (fierce and determined) so I went looking for Viking weaving patterns. I found one meant for tea towels (ie. much finer fabric than I needed), I decided to give it a go with soft wool rather than cotton as an experiment. Clutching the simple weaving draft, I went looking for wool in my stash to do the job. My friend loves red and black, so that’s what I looked for. I ended up with some black wool/acrylic blend warp and red/purple wool/acrylic blend weft (which means she doesn’t have to hand wash the scarf).

The Viking tea towel draft
A stray ball of yarn, I don’t have too many red yarns as it turns out.

After threading up the warp using the draft… a new skill I am very proud of… I began to weave.

The weaving part of the project took two weeks of after work and evening weaving to complete. The finished scarf is lovely to look at and has a nice texture. I will have to soak it in hair conditioner as it feels slightly course (which often happens with woven yarn). Then it is off to the post office to send it on it’s way to New Zealand.

Finished scarf, now for the fringe
The finished scarf.

Every scarf needs a fringe of some kind, so I went looking for something nice to finish the ends. I found a tutorial on making twisted fringes on Youtube (where else?) and gave it a go. I think it came out really well.

The twisted fringe component
Various tea towel patterns from the same warp

By the way; I eventually finished the tea towel warp and ended up with 8 tea towels total from that warp (my calculations were out). I used as many treadle patterns as I could think of and a variety of cotton yarns I found in my stash as weft.

Weaving tea towels on a floor loom

Warning; the following post will not make sense to anyone without a passing knowledge of weaving or a PhD in physics and Quantum mechanics.

Don’t worry though, there are a lot of pictures. I will put a glossary thingy at the end of the post to try to make sense of it all too. If the word is in bold I have tried to explain it in the glossary.

A friend recently gave me an old floor loom she had been storing in her studio; she had been planning to take up weaving when she retired, but discovered a love and talent for painting instead. The old loom looked like it just needed a bit of TLC to be usable, so home it came (thank you Evelyn).

I looked for a makers mark (so I could identify parts for her), but there isn’t one. I can only assume that she is a hand made loom. After a good clean up with soap and water, a polish with my home made furniture polish and a scrub down with kerosene for the metal parts, I discovered that she really needed her cords replaced and the heddles were a bit too rusty for use.

When I had saved up enough to buy some Texsolv cords and 500 wire heddles, I ordered them online (good old Ebay) and waited for what seemed like forever. While I was waiting I developed an interest in weaving tea towels, they seem so pretty and sophisticated when they are hand made (and I may develop an interest in washing up if I had them), so I found the best deal on very thin (8/2) cotton yarn I could find (still very expensive) and bought some.

When the parts for my loom arrived I spent many hours taking her apart, bit by bit and replacing cords, heddles, heddle guides and making sure everything was adjusted just right. In the process of doing this I discovered a lot about my new loom;

She is a four shaft, counterbalance loom; this means that each of the four sets of heddles on their timber frame is lifted by the actions of a roller, meaning that the opposite set of heddles is lowered at the same time. These looms were the first type of floor loom to be developed, they are the loom version of a Ford Falcon; easy to understand, effective and fixable.

The rollers at the top are what lifts and lowers the frames to make an opening (or shed) to put thread through (weft) to make woven cloth.
This is a bad shot of my 8/2 cotton yarn stash.

Once the loom was back together, I put on a warp of 8/2 cotton in a standard twill threading. If you are one of those clever people who can read weaving drafts, see my threading below.

This is a basic twill draft.
This is the basic twill pattern in action

After weaving one tea towel (of a possible 4 from the warp I put on), I discovered that 3 threads were wrapped around their heddles, one thread was broken and some of my heddles were back to front…so…off came the warp (well, the towel was cut from the loom and the warp was left wound on but not in the heddles or reed). I fixed up the heddles and re-threaded the heddles in another pattern, this time a pointed twill draft (I figured I may as well try out something new).

This is the pointed twill threading with two possible patterns by changing the treading pattern.

The plan is to try the bottom treadle pattern on the last tea towel on this warp. I am enjoying the technicality of weaving, and the variety of patterns I can make on a loom with more than two frames. I hope my explaining hasn’t made it seem very complicated, it really isn’t. There are just some amazingly cool words used for weaving and I am in love with the jargon.


Glossary

Maker’s mark– a badge or brand that tells you who made the loom…the brand name. Some common brands are Ashford, Grimalka and Louet.

heddles– The string or metal bits that the thread passes through to make the weaving pattern. They are attached to a frame, my loom has 4 frames with 100 heddles on each frame.

The thin metal vertical things with the thread running through them are heddles.
This is a single heddle

Texsolv cords– These cords are made specifically for looms. They have loops along their length so pegs can be used to hold them together.

This is Texsolv cord with it’s little plastic pegs.

Weaving draft– The pattern or recipe that weavers use to make a specific pattern on the cloth. Or in my case…the pattern a beginning weaver uses as a jumping off point for all sorts of interesting balls-ups and ‘learning experiences’.

The threading means which threads go through which heddles on which frames (a whole heap of ‘whiches’, I know). Tie up is what frames are tied to which peddles, and treadling is the order the peddles are pressed to make the pattern. The draw down is basically a diagram of what the pattern will look like.

And for a change of pace, I am weaving a little scarf with scraps of hand spun wool on my rigid heddle loom.

Just a scrappy scarf