Visible mending – mending a tear in a sheet

I had a break from spinning for the last two days to do some much needed mending. Among the pile of things to fix and put back into working order was a fitted sheet that Melvin (the wonder dog) had ‘dug’ a tear in. I don’t know why he feels the need to dig up the bed if it isn’t made immediately, but he does.

He managed to make an L shaped tear about 2 cm long on each leg of the L. I found a YouTube clip that showed me how to darn it and away I went to give it a go. Of course I used a contrasting colour of cotton, mostly because I only had navy cotton in my kit and the sheet is a mossy green colour. It turned out well I think, it is an obvious darn (of course) but the area feels strong and there aren’t any lumps to annoy my princess of a partner at night (I hope).

The basic method of darning for socks and for sheets (or any fabric) is the same; to anchor thread in solid fabric then build a web of thread, to weave new fabric into, over the hole. In the case of this sheet I didn’t even try to keep it neat and tidy. The darn is… chaotic and wild. I like it actually, I think I would have used a much brighter colour if I had thought about it more deeply, and I will do that next time.

The start
The basic structure is done
Just a little more to do
The final messy darn
The underside of the sheet in close up
Mended some socks while I was at it

The darned area survived its first two nights on the bed. My princess partner didn’t complain about any peas in his bed. I think this is a win all round. I will continue to darn our sheets to get the longest life possible out of them before they become clothes, animal bedding and cleaning cloths (then eventually, floor mats). I love making things stretch, it makes me feel so accomplished.

Making unpaper towels

With a new puppy (sometimes two) and a permanent house goose living in the humpy, we have a lot of use for cleaning rags and products. The state of our floors is a constant worry for me as the dirt, hair and feathers seem to collect into drifts in corners and into dust devils under cupboards (dust bunnies is too tame a name for the tumble weeds of waste we collect) if we skip a day of sweeping. Washing the floor is a full body workout achieved by scrubbing the floor with bicarbonate of soda and vinegar and a broom, then sweeping up the leavings once it is dry. At the moment, we use a paper towel to soak/wipe up puppy and goose mistakes, then give the area a spray with my special cleaning fluid (a mixture of vinegar, peroxide, essential oils and a squirt of detergent). I want to move away from using paper towels to reduce our carbon footprint and save some money, so I decided to swap to unpaper towels.

Unpaper towels are a much more upmarket version of my counter wiping rags. At the moment I use an old rag (usually from a sheet torn into squares) to clean the kitchen counters in conjunction with my cleaning spray. The rags are changed often and I usually have a pile of them to wash with my vegetable bags every week. Unpaper towels are just a hemmed and pretty version of these. I have historically not been worried about things being ‘pretty’, but I am finding that as I age the impulse to include appearance in my considerations is increasing.

My current cleaning rags are somewhat past it (whatever your definition of ‘it’ may be)

I decided to make two sets of unpaper towels; one for the kitchen and one for the floors. The kitchen towels will be made from a pretty flannel fabric and the floor towels will be from a plain colour to allow for vinegar soaking to sterilise. Both sets will be stored in a roll popped into a glass jar with a lid (to keep them dust free and mouse safe). I will hang two lingerie washing bags (two different colours to avoid confusion) in the kitchen somewhere to hold used towels and I can wash the floor towels with the other pet cloths and towels, and the kitchen towels can go in with the tea towels. Now I have a plan set in my mind, it’s time to find some fabric.

I found some smallish pieces of flannel fabric and some promising YouTube clips (I used this method to make the wipes).

The printed flannel is for the kitchen counters and the plain grey is for the floors.

I cut off about a metre of the fabric and folded it in half and cut up that line. I continued to fold and cut pieces in half until I had a pile of wipes the same size.

The first fold and cut.
The end result; there are 24 of each fabric.

From that point it is a simple matter of overlocking around the edges of each one; a monotonous task, but very satisfying.

Hemming each wipe took a long time.

Then the towels where rolled into a roll like paper towels and I tested whether I could pull wipes from the middle (I could). I found an empty jar of the right size and popped the roll into it.

Then I just had to try out my new toy! I used one as a wipe for the kitchen counters with my spray and dropped it into the waiting washing bag. A very satisfying experience; I do love using my projects.

I am hoping that this project will be as successful as the bidet and family cloth system. We no longer need to buy toilet paper (except for visitors and my less adventurous daughter) and hopefully we will no longer need to buy paper towels either. I am dropping out of shopping, one item at a time.

Of course the overlocker broke a needle and I did not finish the floor cloths. Oh well… tomorrow is another chance to make stuff.

Update: I managed to fix the overlocker (and gave it a good clean while I was there) and finish the floor cloths. While I was in the mood for sewing, I also made a couple of small bins for the car. I need a rubbish bin in my car desperately to help keep the rubbish in one place. Maybe I need to make some wipes for the car too.

Making work horse tea towels

My new work horse tea towels
These are two of the last lot of tea towels I made. They have worn fairly well in the past year of constant use.

We need some new tea towels; the old ones are getting a bit ratty looking. I have been only using my hand made tea towels for a year or two now, and they have worn really well, but they have reached their limit. I decided to make up some plain and simple, but long lasting, smallish tea towels.

I pulled out the rigid heddle loom and some dark green, 8/2 cotton. I warped 120 ends with one strand per end and about three metres in length. Then I went looking for a waft yarn; I found a big roll of hemp yarn and another one of cotton 8/2 thread. I decided to use one of each strand as a double weft, and off I went to weave.

The weaving part went fairly quickly as I had some ghost stories on my computer as audio files that just played away while I wove sitting on my bed. After a week of weaving an hour or so most days, I had a big roll of cloth.

This weave looks sort of like a brick wall to me; what do you see?
Melvin helped me out at times
The roll is getting bigger and bigger.

I took the roll off the loom and overlocked the ends to secure the weft, then I washed the whole roll. This helps to make sure the cloth is not going to shrink any more once it is hemmed up and it also helps to stabilise the weave somewhat before it is cut into tea towel size pieces.

I used paper clips to mark the measurements for the tea towels. You can also see the loose lengths of weft where I started a new shuttle of hemp and cotton.
Overlocking the ends.

Each tea towel is going to be 25 cm wide and 40 cm long. I measured each length, cut and overlocked each end. I decided to leave the ends overlocked but not hemmed. I think this will wear well, but if it doesn’t I can always hem them later. I trimmed up the loose threads and folded my new tea towels.

I do love being able to make my own cloth items; it makes me feel so self sufficient! My next project is some rag rugs to use as bath mats in front of our new shower. They will use up some of our old,ripped and worn out clothes (which are made from old sheets and quilt covers in their turn).

I have been unwell lately; dizzy and weak with not much inspiration to do anything, I am hoping that this project means I am on the mend now. Weaving a project takes a fair amount of sustained concentration and energy, so the fact that this project only took a week of spurts of work means that I have more energy than I have had for quite a while. I have also ordered some more cotton for a more complicated project I will be making as a house warming gift for a friend.

A gratuitous photo of Melvin and his sister Penny. Penny is staying with us for a few days while her human mother is having a new baby (a human one). Penny is totally different to Melvin; so small and fine built, but they love to see each other and she keeps Melvin in line better than anyone else.

#coronavirus- sewing family cloths

TMI WARNING; In this post I will be talking about toilets and what goes into them. If you can’t talk poop…read another post.

When I started using the camping bidet (henceforth known as the bidet) instead of toilet paper, one thing I was not happy about was the wet and dripping behind. While it is a small thing to deal with in the face of a global pandemic it is slightly uncomfortable. As usual, I turned to the internet to research a work around. I had considered family cloths as an answer to the toilet paper problem, and decided they were too much work; with soaking and rinsing and individual washing, not to mention the smells (of which we have enough already). However, using family cloths to dry the bottom area after a good hosing with the bidet, that seemed to be an easily implemented answer.

From what I have read, it seems that all I need is some relatively soft fabric, capable of absorbing fluid and preferably made from a natural fibre. I looked through my fabric stash and found a likely candidate… an old flannelette sheet. I cut out some smallish squares (15cm X 15cm) and overlocked the edges to prevent fraying.

I have a few old sheets in my stash. They are so useful.
Using a quilting board to cut out my squares.
My pile of 40 or so family cloths.
Darby goose looks on curiously.
A big pile of overlocked squares, ready to be used.

Next I found a container to hold the clean ones in the toilet and a bin and cloth bag to hold the used ones until wash day. The cloths will be washed with the underwear in a warm wash with soap nuts and lime essential oil.

The cloths are on the left in that little container, it holds 30 squares. The toilet paper is for my partner to use (and visitors…eventually).
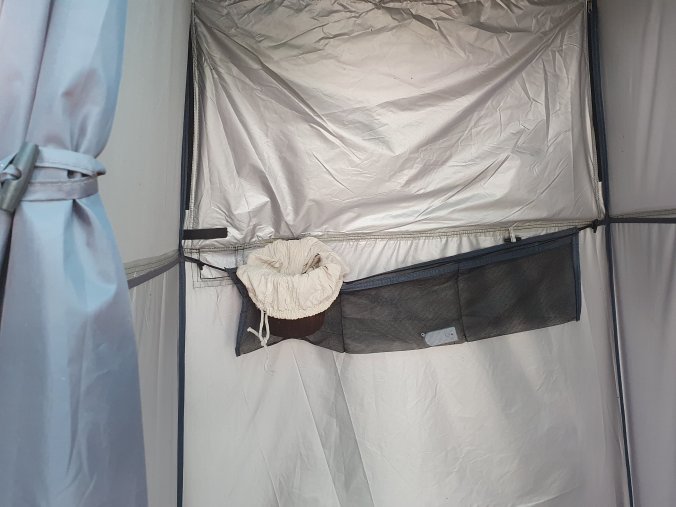
The basket for collecting the used cloths. the toilet is in one of those camping shower tent things, so the hanging pockets come in handy here.

This little project couldn’t have been any easier. Within an hour I felt like I had solved the problem. This is one easy way to solve the wet bottom problem.

Making beeswax wraps

My new stash of beeswax wraps

My youngest daughter recently sent me a present which included three beeswax wraps, which I put into immediate use. I use them to cover the bowl while I proof bread, while resting pastry, I use them to wrap lunch for the day, to wrap cheese in the fridge and to wrap the bread in the cupboard. I love them, and three is not enough for the various uses I put them to. So I am making more for myself (of course).

First, I need cotton fabric. The wraps need to be made from 100% cotton, so I looked at old shirts, old sheets and in my fabric stash. I found some likely candidates, but nothing that stood out as 100% cotton; it is very hard to find something second hand that is all cotton (at least in my house). Next I went looking at Spotlight online, and I found some very colourful (school themed) fat quarters. I ordered enough to make piles of new wraps.

Next we need beeswax (as a starting point), I have always got organic beeswax on hand as I use it to make soap, hand creme, furniture polish, etc. I did come across some tutorials that recommend using ingredients such as pine resin and jojoba oil to help make the wraps more antibacterial and longer lasting. Eventually I came across a kit that was for sale locally. I ordered a test kit through Ballina Honey The kit came in record time and contains everything I need to make my wraps except the fabric. There are some beeswax chunks, a bag of pine resin and a small pouch of jojoba oil; I am now ready to go…

The ingredients and materials (and a cup of coffee)

The instructions in the kit gave three options…

As I was looking for the simplest method, I chose to heat up the required 2:1:small splash ratio of (respectively) beeswax, resin and jojoba oil in a pot on the stove. I floated the pot in a larger pot of water to make a double boiler.

Melting beeswax, resin and jojoba oil

Then I tried to paint the wax mixture on with a paint brush. This was not very sucessful as the wax seemed to take forever to soak through. I speculated that this was because it was a fairly cool day. The surface of the fabric was left lumpy and caked. So on to method two.

Ready to start brushing on wax mixture
The results were just too patchy and lumpy.

I put the fabric between two pieces of baking paper and ironed it with my tiny little 12 Volt sewing iron. This worked to a degree, but because it takes so long to heat up it was a very slow process.

After using the ironing method and the oven method.

When I was sick of ironing (it doesn’t take long), I put the fabric on a baking sheet and popped it in the oven for a few minutes. This worked really well and I decided this was the way to do it.

So for the next several hours I popped pieces of fabric in the oven with the premade beeswax mixture.

Ready to pop into the oven with grated wax mixture sprinkled over it.
The melting is slower in the oven, but much more uniform.
Then the edges were trimmed with a pair of pinking shears
The resulting pile of sticky wraps for school lunches and such.
The whole pile fits into a lunch box in the cupboard, ready for use.

I love using these wraps, and they will reduce our use of cling wrap and aluminium wrap. I wonder if I could make some oiled cotton to sew bags and things out of?

Re-covering an old lounge- part three- the arms

As predicted, the lounge recovering is going slowly. This weekend I managed to cover the arms of one armchair. I don’t mind taking my time with the job though, I am learning so much along the way. The fact that the whole pile of work-in-progress is sitting in everyone’s way is annoying, but we are coping with a minimum of snarky comments and stubbed toes.

The inside arm covering was not without it’s challenges. There was a broken piece of frame to be fixed and a lot of tucking and stapling to do…

This is the broken arm support. We just screwed a piece of 2 X 1 pine over the top of it and it held well.
The first arm all stripped down to the foam.
First I covered the arm with some new cotton batting.
Then cut a big rectangle of the fabric and started tucking and cutting little slits before stapling it all in place.
The front of the arm really needs some help. I think I will have to untack it and trim the cotton wadding back a bit to reduce the puckering.

I do love the wheat colour of the fabric, but I am learning that I have to go very slowly on this project or I make silly mistakes like putting the wadding too far forward over the front of the arm. Oh well… on to the inside back next.

Making some fabric organizers for the humpy

I enjoyed making my fabric boxes so much that I decided to make some smaller ones from the scraps left over. These little hold-alls have the advantage of being able to squash into a smaller space because they are flexible. The process of making them is also really easy;

Cut two pieces of fabric and one piece of interfacing to your desired size. The size could be a square or a rectangle, as long as you can match one side to the other. I went with 30cm squares to make these small trays because that is the size of the scraps I had left over.

Fold your lining in half and sew up the sides with the right sides together. Do the same for the outer fabric, the interfacing can be sewn to the back of the outer lining at this point.

Fold the corners down so that the side seam lays on top of the bottom fold. Decide how wide you want your base to be and mark the measurement. Sew across the corner and trim the excess. Do this for the outer and inner fabric pieces.

Turn the outer fabric right-way-out and put the lining inside. Fold down the lip of your new fabric tray or bin and sew around the lip to make a nice neat seam.

Now fill your new hold-all with all the little pieces of junk laying around.

They are so much fun to make, I think I will make a heap of them for my clothes draws. They are a great stash buster too, my fabric stash is down to a manageable size in such a short time and I have very little fabric waste from making them.

New yarn storage system

wow…I have such a lot of yarn. Hand made, recycled and gifted, you name it, I have it. In my push to make more room in my seriously overcrowded craft room, I bought one of those fancy cube storage units (yes, it was a wrench to part with that much cash and yes, I did find a second hand one on GumTree the day after I bought it). We put it together one day after work, when we were both tired and cranky (which accounts for the fairly large ding in the wood of the bottom piece). We are still married, so I think we passed the IKEA test, the one where you have to put together some modular furniture as a team before you decide you are compatible.

This photo was taken after I started making bins for the spaces.

Once the unit was up and in place I went looking for a pattern for those attractive and useful fabric storage bins. I found heaps and was really looking forward to making a dent in my fabric stash when I ran across a problem; interfacing. I don’t usually use it at all, and all the patterns say I need something to stiffen the sides of my bins (makes sense). So off I went looking for an alternative. Soon I found a clip of a woman making storage bins from old clothes, she used rice bags as interfacing…and that’s when I had my lightning-strike-to-the-brain idea. Why couldn’t I use old feed bags as interfacing? They would be noisy and crinkly, but that doesn’t matter for something that will spend most of it’s life sitting on a shelf. The bags are prone to breaking down in the sun, but they would be covered by fabric, and indoors. The poly bags may be slippery and hard to sew, I found some posts about people using them to make bags, so it is possible. I decided to give it a try.

I found this YouTube tutorial to use as my basic pattern idea, I just made them bigger.

First step was to make my pattern; I wanted cubes that were about 30cm square, so I made a simple net pattern out of newspaper.

I used my newly organised fabric draws to find some fabric for these boxes.

I ended up with some interesting options. I’m not the sort of person who worries about things matching.

Next I cut out pieces for the outside and lining of my boxes.

I cut some pieces of feed bag to use as interfacing.

Then it was a simple matter to sew up the bins as instructed by the tutorial.

So far I have five done. My plan is to make a bin for every space in the cabinet and store all my yarns in them. There are still three huge plastic boxes full of yarn to go.

Some tips I have discovered along the way; use grain bags not chaff bags, the weave is too loose on chaff bags and they fray really easily.

The chaff bags fray a lot.

The grain bags are easy to sew and give a good amount of stiffness to the bins, but they are just a bit too small for the 30 cm square bins. I sticky taped two together to get a sheet big enough, it seems to have worked.

This bin is made with the grain bags.

So far I have really enjoyed this project. Hopefully my yarns will be visible and usable once it is finished.

Sewing myself a new file bag for work

Now that I have the fabric and the card woven strap made for my file bag, I can start the sewing-it-together step. I decided to keep the pattern I had rather than making another strap (laziness).

I found a really good tutorial for making a messenger bag on YouTube which I am going to (loosely) follow.

First I cut out a single piece for the two sides of my bag and a piece for the flap. I also cut corresponding pieces of lining material and some cotton batting I was lucky enough to find. I sewed the batting to the lining pieces to make them easier to handle.

Then I sewed the side seams of the bag up and made those cute little corners (like I did for the tote bag). I did the same for the lining pieces. I also sewed the flap pieces together, right sides facing but leaving the top edge open so I could turn it inside out and top stitch.

Then I fiddled around with the best way to put all the pieces together so I could sew up the around-the-mouth seam of the bag. That one seam attached the handle, the flap and the inner and outer pieces together, but only if they were in the correct order.

Eventually I figured out the sequence (and then didn’t photograph it, but it’s the same sequence as in the tutorial video) and sewed the whole thing together. I turned it all right side out through a small hole I had left in the seam for the purpose.

After the small hole was sewn shut, I had my bag.

I have really enjoyed this little project and it has come together much faster than I would expect. No, it’s not perfect; the seams are wonky and some of the weaving is a bit dodgy, but I made it, I had fun doing it and I have something useful at the end of it. What more can I ask from life?

Make a tote bag from hand woven fabric

I am busily using up scrap yarn from my overflowing stash. As part of that I wove a piece of fabric that is frankly…um…mixed up; I used all sorts of fancy yarns in the weft, eyelash yarn, boucle yarn and a little bit of ladder yarn. All that in no particular order, colour or pattern, just throwing in a little bit here and there.

What to do with this fabric? I decided to make a tote bag.

First I cut it off the loom and overlocked the edges.

I gave it a wash too, to test for shrinkage.

Next I cut a lining the same size and some handle material.

Then it was time to sew up both the bag and the lining into basic bag shapes. Leaving a small hole in the bottom of the lining to turn the whole thing inside out.

Sewing across the bottom corners gives the bag a nice square bottom. I didn’t forget to measure the same distance down the corner seam on each piece. I sewed the lining corners the same way.

The corners were folded so that the bottom seam and the side seam lay on top of each other; the seam you can see in the photo below is the side seam, it is laying on top of the bottom seam. This makes a sort of cross seam at the base of the bag.

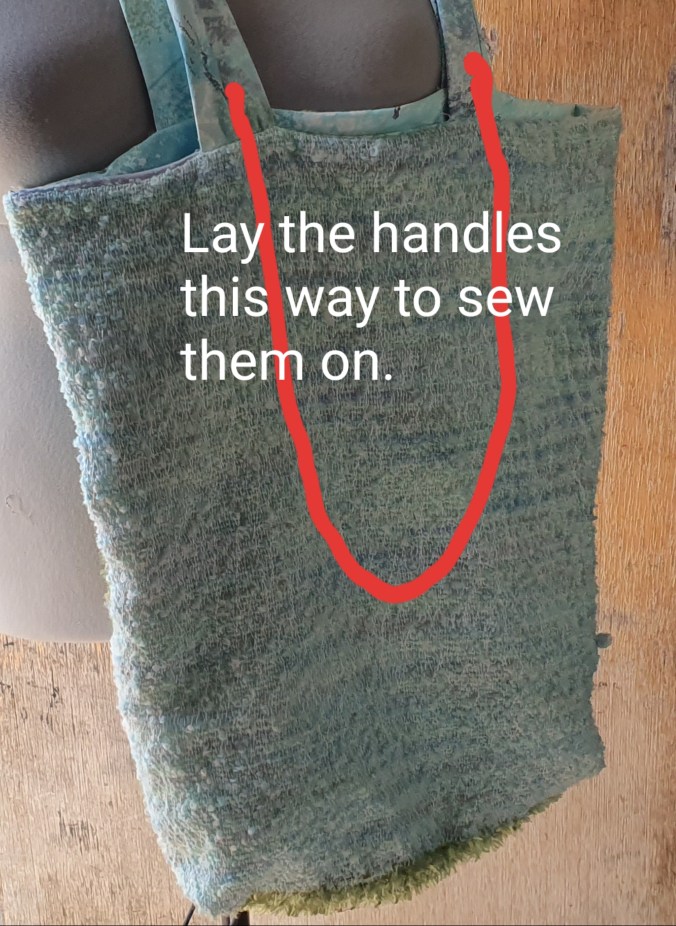
Finally I sewed the top of the outer bag to the inner lining. The handles can be pinned between these layers. I went over the handle joins more than once when sewing this part; handle joins are subject to a lot of strain. The handles need to be looped downwards with the ends facing up towards the top of the bag, when sewing the top seam (I learned that the hard way).

Yes…the handle is the wrong way around. I had to unpick and re-sew the whole thing with the handles the right way around.

I turned it all inside out (or right side out) then sewed up the hole.

There’s the bag done. Not too bad for a scrap yarn project.

Now on to spinning more yarn to make more fabric to sew more things.